Making HTTP Requests
Introduction
A HTTP request allows communication between a client and a server. If you wish to use API's in your Mobi Builder application, you will need to use HTTP requests.

Methods
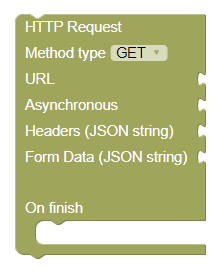
When making a HTTP request, you are required to set the method type. Typically, if you are using an API, the API will tell you what method to use. You can use get if you wish to retrieve data, post and put if you want to send or update data and delete if you wish to delete a resource. You can learn more about different method types here.
Parameters
| Method type | Selection: The method type of the HTTP request. Read 'methods' in this documentation for more information. |
|---|---|
| URL | String: The URL that you wish to make the request to. |
| Asynchronous | Boolean: If asynchronous is false, your program will wait until the HTTP request is finished, before executing any following blocks. If asynchronous is true, your program will continue to run following blocks while the HTTP request is made. The on finish part will only run after the HTTP request has been finished. |
| Headers (JSON String) | String: A JSON string containing the headers for this request - eg. {'userId': 7056} |
| Form Data (JSON String) | String: A JSON string containing the form data for this request - eg. {'file': 'myFile.txt'} |
Notice: If you put {'file': 'myFile.txt'} in a string block, it is a JSON string not a JSON object. For the headers and form data parameters, you should provide a JSON string not a JSON object.
Cross origin issues
When doing HTTP requests, it is common to come across cross origin issues. To combat this, you can use CORS anywhere. When using this, you will need to add https://cors-anywhere.herokuapp.com/ before the URL's that you currently have. You will also have to set Access-Control-Allow-Origin header to * and the Access-Control-Allow-Headers header to X-Requested-With. In the headers JSON string that Mobi Builder uses, this looks like:
{"Access-Control-Allow-Origin": "*", "Access-Control-Allow-Headers": "X-Requested-With"}
However, a problem with CORS anywhere is the vast quantity of people using it and the limited quotas that CORS anywhere is hosted with. This means that it could go down at any time (probably temporary). Fortunately, you can create your own with a few simple steps. You will need a heroku account, git installed and set up and the heroku cli installed and set up. You will also need to have npm installed and set up. After you have done this, type in the following commands:
git clone https://github.com/Rob--W/cors-anywhere.git
cd cors-anywhere/
npm install
heroku create
git push heroku master
Afterwards, you will end up with your own CORS anywehre proxy running at https://*.herokuapp.com
You can learn about cross origin resource sharing here.